Welcome

Welcome to my blog ...thanks for visiting!

Thursday, December 31, 2015

Last bits of sewing 2015 - Flying circle of geese wreath

Hello!

In an effort to dust off my sewing machine and get myself in the Christmas spirit early in Dec, I decided to try a circle of geese block from Piece by Number - something I've wanted to do for quite awhile!

This pattern was super easy to follow - even for a beginner like me and as a bonus, I was able to use up some Christmas charms from my stash.

I thought about some kind of table covering at first, but it seemed like such a cute little wreath, I went ahead and called it finished after adding some quilting and a printed ribbon.


This went to another friend (via a heated game of Dirty Santa) who has since moved back to America and I'm so glad she took a little something from me with her ;).

Incidentally, I found a really helpful tutorial for adding a hanging loop to a wall quilt. It's genius! Check it out at Winding Bobbins. It's perfect for using a lightweight ribbon to a small wall quilt.

FMT

Last bits of sewing 2015 - Radschlager gift pouch

Hello again! It's been quite awhile, as usual, but I've had some adventures over the past couple of months. In addition to an awesome trip to Turkey with great friends, my husband and I celebrated our 25th anniversary in the Maldives. What a trip! I can't say enough good things about that place, and I hope I get to return someday very soon. All that traveling has left me without a lot of time (or willpower) for quilting, but I managed to get a couple of things finished.

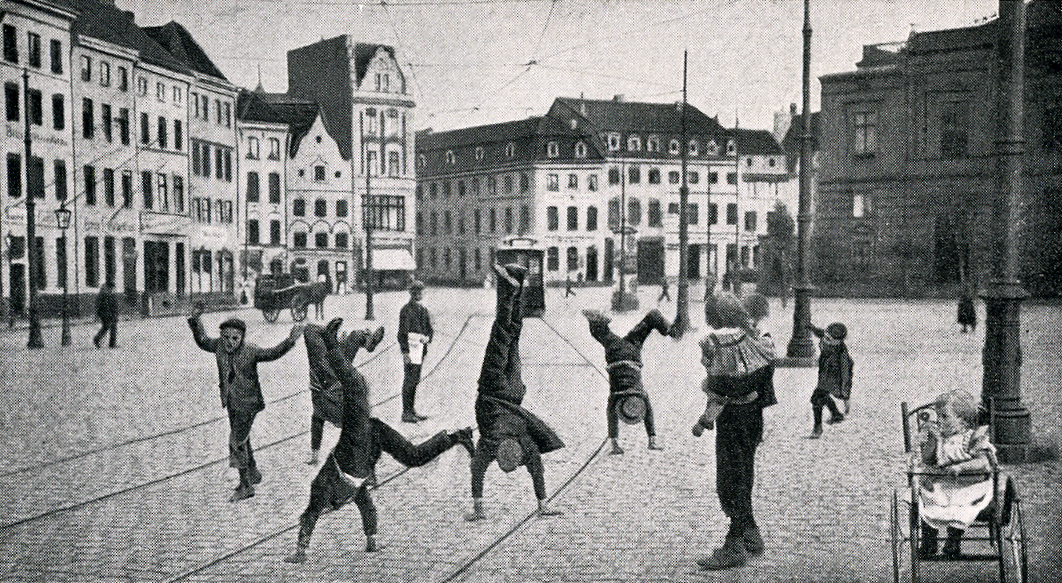
First up, as a going away gift for a girlfriend, I wanted something to commemorate her time in Dusseldorf. A few months ago, sweet Kristy from Quiet Play helped me with a paper pieced design for the Dusseldorf symbol - the Radschlager. This joyful, cartwheeling child image can be found all over the city, including manhole covers, street signs, in bakery windows and even in chocolate!
Cartwheeling children in Dusseldorf in 1900 
Manhole Cover - Dusseldorf

 I decided just to freestyle a pouch with no big plan in mind besides using hot pink (my friend's fave color.) In my first attempt, the image finished at 6" and the pouch is about 9" x 7".
The patchwork back
 I thought it was ok, but I wanted to try it slightly smaller, so I reduced the pattern to finish at 4" and switched the colors, so the background was hot pink and the Radschlager was silver.


I ultimately ended up going with this second one, but I forgot to take a picture of the finished pouch! Whoops! I used denim for the background and back  and in my "freestyling" ended up with an obnoxiously huge pouch. It may be big enough to carry a small dog. Still, I embroidered her name on it and wrapped that sucker up in time for her going away party. I'll have to remember to ask her for a picture of it! Miss you, Renee! Now I just hope she doesn't see this post and wish she'd gotten the first pouch lol.

FMT


Saturday, October 31, 2015

Tidal Pool Tutorial

Hello everyone!

This past week I, along with 75 of my closest friends, had an opportunity to test a new pattern for Mollie Sparkles called Tidal Pool. It's a really cool block and I love the variations I've seen in sea colors, but I decided to use fabrics that would match the bee quilt I've been trying to finish forever. It goes together pretty quickly if you use non-directional fabric - whoops!
Tidal Pool Block
Fabrics:
1. Lizzy House, 1001 Peeps in Jewel Purple
2. Clippings in Spackle from the Paint Collection by Carrie Bloomston

He has also made a variation of the block here. I think it would be fun to use a text print and have the "leaking" color in white and then go to a solid grey background. Maybe I'll do that for my next try!

I think 25 bee blocks is finally enough to sew this quilt together! It has been in progress for at least 3 years. To sash or not to sash...
FMT

Monday, October 26, 2015

The Quilter's Planner


Hello Everyone!  Do you remember that Treasure Hunt block I designed for the Fabri-Quilt New Block Blog Hop? It will be one of 52 featured in The Quilter's Planner 2016! Stephanie Palmer (Late Night Quilter) has created an incredible tool to help us get organized!


Stephanie is self-publishing this book through Indiegogo and has already tripled her initial goal! 

What’s Inside:
  • Monthly calendars
  • Weekly calendars
  • Project planning pages
  • Swatch saver
  • Graph paper
  • Free motion quilting practice pages
  • Goal-setting prompts
  • 8 full quilt patterns from amazing designers (Cheryl Brickey (Meadowmist Designs), Yvonne Fuchs (Quilting Jetgirl), Amy Garro (13 Spools), Lee Heinrich (Freshly Pieced), Mandy Leins (Mandalei Quilts), Pat Sloan (Pat Sloan), Kitty Wilkin (Night Quilter) and me).
  • 52 original quilt block designs from awesome quilt bloggers
  • Gorgeous artwork pull-outs by the talented Kelsey Boes from Lovely and Enough
  • Reference section for quilting calculations and common construction techniques

The cost is just $35 and there are discounts if you get one for yourself and one for a friend!  I hope you will support Stephanie - I'm off to order mine! 

FMT

Wednesday, October 7, 2015

Quarter 4!

Wow, I can't believe it's already time for the 4th quarter of the 2015 Finish Along! I've done miserably with my proposed finishes, but have completed more projects for my own home than in any year I can remember, so it's still a win for me!

In Quarter 3, I attempted to finish these things:

1. Birthday Quilt for my son. 

'Result - I finished the top! I'll move the quilting/finishing to next quarter.

2. Ballerina drawstring bag - Finished! 
3. Placemats - still need 2 for kitchen table. - Finished! 


4. Paper airplane pouches (a few of these have been requested by friends.) - not even started! 
5. Dusseldorf pouches (making a few for a craft fair) - not done
6. Finish bee quilt - I'm not sure where this thing even is lol. 
For Quarter 4  I will attempt to
1. Finish Birthday quilt. Maybe it'll turn into a Christmas quilt? 
2. Dusseldorf pouches
3. Paper airplane pouches
4. Quilt for mom
5. Quilt for friend's new baby
6. Quilt the stinking bee quilt that has been hanging around all year
7. Make something from my toppling stack of Lotta Jansdotter fat quarters
8. Christmas table runner
9. Fairy pillow (using PP pattern from Tartan Kiwi)

I'm not really fussed to complete any of this quickly and it's nice to have no pressure, but wish me luck! 
Linking up with OntheWindySide.

Sunday, October 4, 2015

Pretty Placemats


 Hello again! Next up on the very incomplete list of Quarter 3 proposed finishes, I have a set of kitchen place mats finished this weekend. The 2nd one was actually finished about 25 minutes before my family had to dash out to meet friends for dinner. I wish I had taken a picture of my daughter catching my threads as I snipped the loose ones on the train as we headed to the restaurant!
 Side by side and ALMOST the same dang size...

I really love the texture that quilting provides. I need to learn free motion quilting, but I like the surprise of straight lines when you just keep adding angles - so fun!


Saturday, October 3, 2015

Ballerina Bag

Hello! Just a quick pop in to update my projects for the third quarter of the Finish Along hosted by On the Windy Side. . 

I am proud to have completed this bag for my daughter. She was super excited to show it to her ballet teacher last week. This bag was a mix of paper piecing, improv and a little hint of a bag pattern. I cam across a really cool ballerina shoe pattern from Tartan Kiwi a few months ago, and knew right away that I wanted to make a "Brown ballerina" for my little brown ballerina.

 I made the shoes and then stalled out for a few weeks trying to decide how to execute the bag. I wanted a drawstring backpack with a zipper pocket, but really regretted using Kona white for the background instead of something much sturdier. I finally got back to it and after sashing with a cool grey and quilting, I added a zipper pocket just under the shoes and lined with a black and white print from my stash.

I remembered seeing a tote bag I liked from the S.O.T.A.K. handmade blog, and I bought her pattern. I just used it for the handles and drawstring of the tote and finished the rest as usual. I made the back initials using an alphabet PP pattern 


I'd say she's a happy gal and ready to retire her plastic ballet bag now ;)

Thursday, September 3, 2015

Treasure Hunt ~ Fabri-Quilt blog hop

Hello and thank you for stopping in for my block tutorial in the Fabri-Quilt New Block Blog Hop! Fabri-Quilt has generously provided participants with fat eighth bundles to work with and you can win one as well - just visit our host for today: Terri Ann of Childlike Fascination

As I mentioned in my last post, we were to be inspired by summer and I have been amazed by the blocks created by the fellow members of this hop! The Pinterest Board is filling with loads of cool block tutes. 

Please also visit my mates today as they share their new blocks!
Sandra of One Million Stitches

Treasure Hunt

This simple block reminds me of treasure on a map with the big red X marking the special spot and the blues and greens remind me of the ground or forest. The slightly angled sides make the X look like it pops out a little 3D style.

Given my "transition" period with Windows 10 and EQ7, I ended up making this block by 2 different methods.

Watermelon Summer F8 Bundle

Method 1:

Cutting:
Background (blues/green): 
  • Cut (4) squares 4½" x 4½" 
  • Cut (4) rectangles 5" x 4½" 
    • Subcut into (8) 2½" x 4½" rectangles
Center X (rose): 
  • Cut (1) square 4½" x 4½"
  • Cut  (4) squares 1¾" x 1¾”
  • Cut (8) squares 2½” x 2½”


Prepping:
·      Lay out squares in a pleasing arrangement

On the (4) 1¾” rose colored squares, draw a diagonal line from one corner to the other


    ·         On the blue & green 2½” x 4½” rectangles, on the long side (4½”) measure up 1¾” from the bottom and make a tiny mark.

    Draw a diagonal line from that mark to the opposite corner


    Sewing:
    ·         The 4 corner squares are simple “stitch & flip.” Place a 1¾" in one corner and pin. Stitch right on the line (or a teeny bit inside the line) - chain piece all 4 blocks. Press and trim ¼” away from stitch line.
    ·         The rectangles are a little different. Line up a 2½“ square with the bottom of a 2½” x 4½” rectangle. 

    Stitch on the diagonal drawn line. Press to set seam and then press the square away from the rectangle.


      In order to nest seams,  press 1 toward the rectangle and 1 toward the square.
    o   At this point, you can trim one of two ways: Flip over so the rectangle is up and use it to trim off the excess rose colored square 

    OR place rectangle right side up and trim to 2½” x 4½".  Then flip the trimmed corner open and trim seam to ¼”.

    o   Stitch matching rectangles together; nesting seams in the center

    ·         Stitch 9 blocks together in normal 9-patch  using a scant  ¼” seam – sew into rows and then join the columns. 

    And you should have a 12½” unfinished Treasure Hunt Block!  

     Here's how it would look as entire quilt

    An alternate colorway really changes the look! 

    Method 2:
    Paper Piecing! Print 4 copies of the template. Ensure that your blocks print out at 4.5" finished.
    There are many awesome paper piecing tutorials available for FREE - check these out!


    Enjoy! FMT
    Related Posts Plugin for WordPress, Blogger...